Monday, January 31, 2011

Lollipop Bouquet

Well, if you are like me, you are starting to think of valentine's day and all the teachers and important people in your lives. I always try to make a unique gift for them, and this might just be one of them this year.  I took some dum-dum lollipops and wrapped them in designer series paper. On the top of the lollipops, I added a scalloped punch and a die cut flower from the big shot. In the center, I used a half pearl to finish the "flower" off.
Made a box out of rich razzleberry and put a foam insert inside the box. The foam helps the lollipops stay put in the box. You could also make these flowers with heart shaped chocolate lollipops, bite sized snickers etc (you'll just have to attached them to a stick) to change things up a bit. Thanks for looking and remember to stamp a little love in 2011!

Thursday, January 27, 2011

Photo cube

Well for this project I combined two of my loves: my kids and stamping! I took a photo cube and adhered designer series paper over all the sides but the bottom. I placed a mat around each of the pictures to add another layer. The final step was the embellishments, which in this project were the paper daisies! The paper daisies are so great because you can color them. How you say? You put a few drops of our wonderful reinkers in water, stir the ink, and place the paper daisy in the reinker! It's that easy. I also used some basic pearls and rhinestones to put in the centers of the paper daisies. The hardest part of this project was picking the pictures.

What a great way to show off those special people in your life. Thanks for looking and remember to stamp a little love in 2011!

Wednesday, January 26, 2011

Flower Magnet

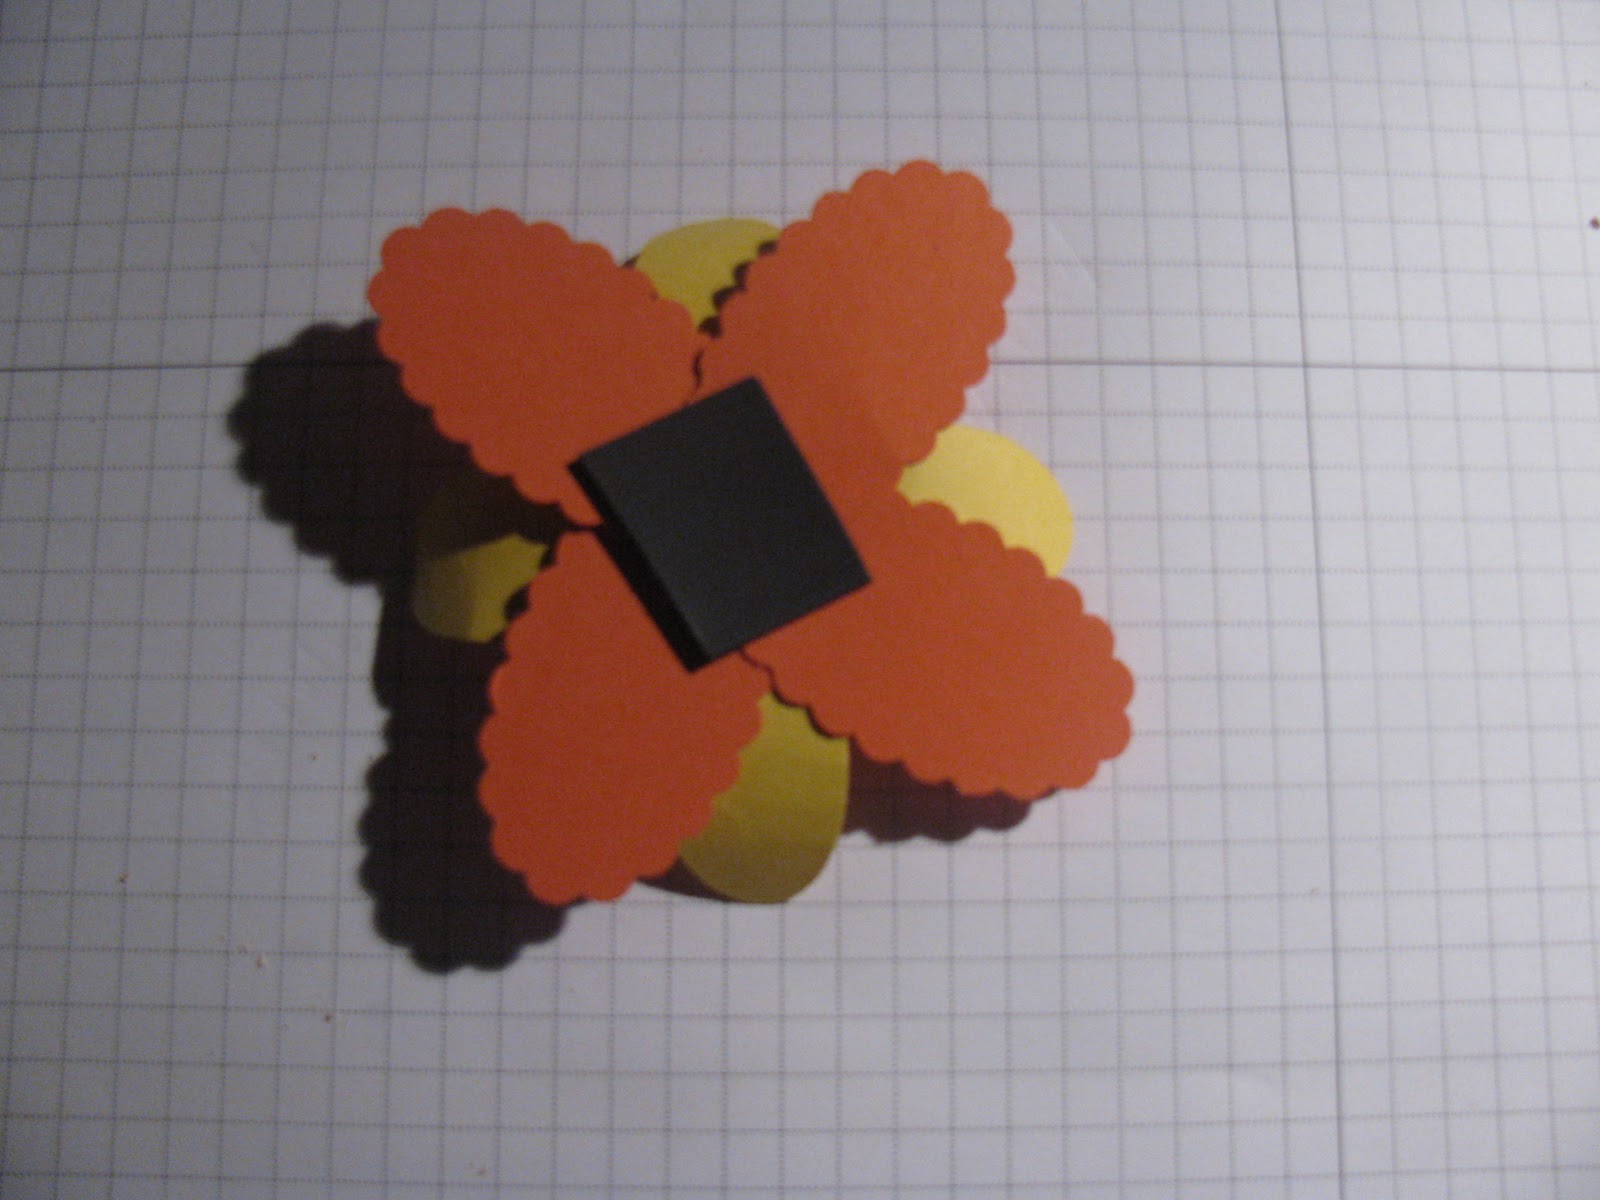
I absolutely love the embellishments in the Stampin' Up Occasions Mini catalog! One of these embellishments is the fabric designer brads. At my last stamp camp, everyone that registered early got to make one of these super easy and fun flower magnets. All you need to recreate this flower is your oval scallop punch, your oval punch, and your scallop punch. I picked tangerine tango, daffodil delight and regal rose as my color choices but you can pick whatever you like (you could also use some designer series paper). Once you've compiled your flower, just put one of those lovely fabric designer brads in the center. I would recommend using sticky strip to adhere the layers of paper together rather than regular adhesive. Then, on the back side, I placed a 1" x 1" piece of magnet so that I can use it as a magnetic.
What a great way to spruce up the side of your refrigerator, and keep all those important notes up there too! Thanks for looking and remember to stamp a little love in 2011!

Friday, January 21, 2011

The last of the birthdays....

Well, this is it--the last of the birthday cards we will be making at my stamp camp. I cased this card from a shoebox I did with some other talented stampers...fellow Stampin' Up demonstrators. I used always artichoke card stock for my base and added a layer of very vanilla that was embossed with my texturz plates on my big shot. I did something different though, I added chocolae chip ink to the texturz plate so that you get a 2-toned textured base. I then added a strip of cajun craze and 3 half oval punchouts. Then got my star punch, and designer label punch and put the finishing touches on this card. Simple yet very versatile! Hope you enjoyed my posts on birthdays and remember to stamp a little love in 2011!

Wednesday, January 19, 2011

It's in the bag!

I don't know if you've gotten a chance to look at all the great new products in Stampin' Up's Occasion mini but they are great! They came out with some great embellishments....ribbon, fabric, fabric brads, buttons, and great glitter brads I used in this card! This is the fifth card we will be making on Sunday at my nothing but birthday cards stamp camp. I used pumpkin pie as my base for this card and ran it through my Big Shot with a texturz plate (do you see a pattern...I'm addicted to my texturz plates). Added a strip of designer series paper, and punched out some circles with the bag from the Birthday Bakery set.  I then colored it in with our wonderful markers. The card still needed something and that's when I reached for those great glitter brads....just the right touch! Remember to stamp a little love in 2011.

Monday, January 17, 2011

Happy Birthday to You!

As most of my regulars know, I have been prepping for my stamp camp on the 23rd and its all about birthdays! We will be making 6 birthday cards and I'd like to share one of those 6 with you. I used   Stampin' Up's stamp set Party Hearty...such a versatile set. Its got all the elements of a great party....party hats, presents, and of course cupcakes! I used  a whisper white card base and then took 2 strips of  paper, one of each: wild wasabi and tempting turquoise. I ran those through my Big Shot with a texturz plate, stamped the party hats in old olive, rich razzleberry, and melon mambo. Added a 1-3/8" circle punch behind each hat, and added some early expresso ribbon to complete the card. The "party hearty" was stamped in early expresso and punched out using the word window punch and attached to the large designer label. Stampin' Up's punches add such great elements to cards and scrapbook pages....just love using them. Want to see what else we will be creating Sunday...check back tomorrow. I've got two more creations to share with you before Sunday! Remember to stamp a little love in 2011.

Thursday, January 13, 2011

Cheers to you!

I have been busy prepping for my upcoming stamp camp and its all about BIRTHDAYS!! We will be making 6 birthday cards, you've seen some of them already. Well, this is the latest creation that will be made at my stamp camp. I used the Stampin' Up cheers to you stamp set....such a fun set. I used whisper white as the base of this card and then embossed it with the large polka dots texturz plate with my Big Shot. Its hard to see in the picture but it adds just the right pizzazz to finish this card. I stamped 4 of the beverages in the stamp set and then colored them in with my pastels---don't use them enough! They add a subtle but great color for this card. Punched all the drinks out with my 1-3/8" square punch and added it to a piece of Pacific Point card stock, added some ribbon and the saying and viola birthday card complete! If you want to come make this card, my stamp camp will be the 23rd of January visit my website at http://www.stampwithlora.stampinup.net/ for more details on the cost and what the class includes. Hope you enjoyed and remember to stamp a little love in 2011!

Wednesday, January 12, 2011

Bring on the cake....take 2!

I just love my new stamp set from the Stampin' Up Occasions Mini! This is the second card I made with the "Bring on the Cake" stamp set and just love it! I am always lacking in masculine cards so I thought I'd try to make one geared toward the male gender. I used More Mustard card stock as my base and wanted to make a unique background so I took some 1-3/4" circles and ran them through my Big Shot with the texturz plate. Its hard to see in the picture but there are mini polka dots that are on the 1-3/4" circles. Then I used the cake stamp from the set and colored it in more mustard, cherry cobbler, and pear pizzazz markers. Thanks for looking and remember to stamp a little love in 2011!

Thursday, January 6, 2011

Bring on the cake

I am getting ready for my upcoming stamp camp where we will be creating 6 birthday cards with envelopes and came up with this card. Its very similiar to a card featured in the Stampin' Up Occasions Mini featuring the new set "Bring on the Cake". I tweaked it a bit and came up with this card, which all my stamp camp attendees will be making. I used the in color Poppy Parade as the base of my card, with whisper white on top of that for my stamped image area. I created the base of my cake platter with Stampin' Up's oval punch (cut in half) and then a scalloped edged strip of paper for the top of the platter. I then stamped both the "happy Birthday" and "so many candles and so little cake" in basic black ink and colored in where needed with our wonderful markers. I used a strip of tempting turquoise to seperate the 2 sentiments. My final touch are the candles at the top that I made with a 3/4" square punch and made strips/candles.
Thanks for looking, and if you want to make this card be sure to reserve your spot at my January 23rd stamp camp. For more information please contact me! Remember to stamp a little love in 2011!

Tuesday, January 4, 2011

Just Believe

This is a card we did at a shoebox! I am part of a very talented group of stampers and this is one of those stampers creations. We used Rich Razzleberry as the base and stamped the flowers from the Stampin' Up Just Believe set in versamark.  We then used our wonderful Big Shot top note die to make the overhang for this card. We used our markers are colored in the flowers with old olive and rich razzleberry to create the 2-toned colored flowers.
Here is what the card looks like in the inside:
Wrapped some old olive ribbon around the bottom and created a unique thank you card. Thanks for looking and remember to stamp some love in 2011!